Leaking compression fittings can be a frustrating and potentially costly plumbing problem. Whether it’s a slow drip or a steady stream, a leaky fitting can waste water, increase your water bill, and even cause water damage. Fortunately, fixing a leaky compression fitting is often a relatively simple DIY task that can save you time and money.
This guide will walk you through the steps involved in identifying and fixing a leaky compression fitting. We’ll cover common causes of leaks, the tools and materials you’ll need, and a step-by-step process for repairing the fitting. With a little patience and the right approach, you can effectively address this plumbing issue and restore the integrity of your plumbing system.
Why Do Compression Fittings Leak
Compression fittings can leak for a variety of reasons, often related to installation errors or issues with the fitting itself.
Improper Compression Fitting Installation: One of the most common causes of leaks is improper installation. This can include:
- Overtightening: Overtightening the compression nut can crush the olive, damaging the seal and causing leaks.
- Undertightening: If the nut is not tightened sufficiently, the compression ring may not create a proper seal, leading to leaks.
- Incorrect Pipe Preparation: If the pipe is not properly cut, deburred, and cleaned before installation, it can interfere with the seal and cause leaks.
- Misalignment: If the pipe and fitting are not properly aligned during installation, the compression ring may not seat correctly, resulting in leaks.
Component Issues:
- Damaged Olive: The olive (compression ring) can become damaged during installation or over time, compromising its ability to create a seal.
- Defective Fitting: In some cases, the fitting itself may be defective, with manufacturing flaws or imperfections that can lead to leaks.
- Corrosion: Over time, corrosion can weaken the metal components of the fitting, making them more prone to leaks.
External Factors:
- Water Pressure: High water pressure can put excessive stress on the fitting, increasing the risk of leaks.
- Water Hammer: Sudden changes in water pressure (water hammer) can also stress the fitting and potentially cause leaks.
- Temperature Fluctuations: Significant temperature changes can cause the metal components of the fitting to expand and contract, potentially loosening the seal and causing leaks.
By understanding the potential causes of leaks, you can take steps to prevent them during installation and troubleshoot issues effectively if they arise.
How to Fix a Compression Fitting?
Compression fittings are a convenient way to connect copper pipes, but leaks can occur due to various factors, including improper installation, damaged components, or external influences.
This guide will walk you through the steps to diagnose and repair a leaky compression fitting.
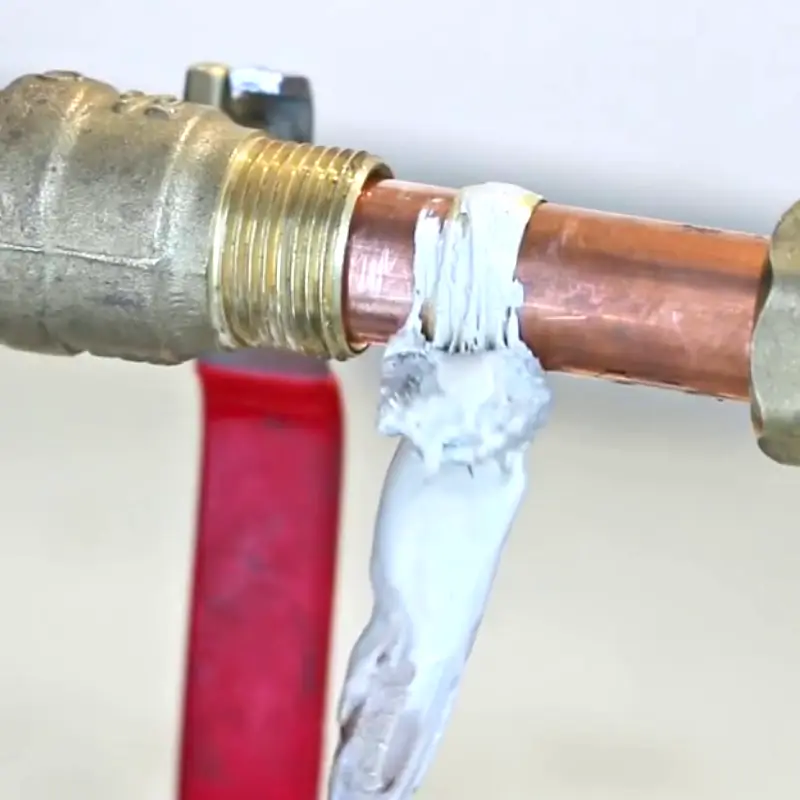
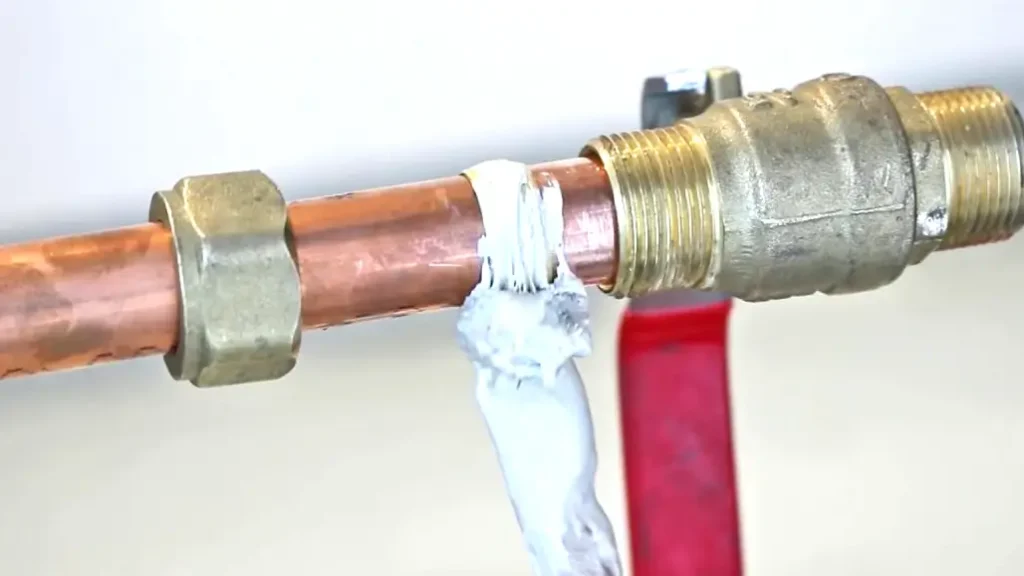
Step 1: Identifying the Compression Fitting Leak:
Pinpointing the exact source of a leak is crucial for successful repair. Don’t simply assume it’s the fitting itself. Carefully examine the area around the fitting for signs of moisture or water droplets. Look for damp spots on the walls, floor, or surrounding surfaces. Listen closely for the sound of dripping water. Gently touch the fitting and the surrounding area. If it feels damp or cool, you’ve likely found the source.
Consider other potential sources of leaks. Could the leak originate from a loose connection elsewhere in the plumbing system? Is a faulty faucet the culprit? Perhaps a slow leak from a nearby pipe is causing the dampness. Thoroughly investigate the surrounding area to rule out other potential sources before focusing solely on the compression fitting.
Step 2: Gear Up for the Repair:
Before you begin, ensure you have the right tools and materials at your disposal. You’ll need two wrenches: one to hold the fitting body steady while you turn the compression nut with the other. Choose wrenches that fit snugly on the nut and the fitting body to prevent slippage and the risk of rounding off the nut or damaging the fitting. An adjustable wrench can be a valuable asset, offering flexibility for different fitting sizes. For stubborn fittings, a pipe wrench may be necessary, but use caution to avoid damaging the fitting.
Keep clean rags handy to absorb any water and wipe down the area during the repair process. If the nut is particularly tight, a penetrating oil like WD-40 can help loosen it. Apply the penetrating oil to the threads of the nut and allow it to penetrate for a few minutes before attempting to loosen it. Optionally, you can use Teflon tape wrapped around the pipe threads before reassembling the fitting for added security. However, use Teflon tape sparingly, as excessive amounts can interfere with the compression process.
Step 3: The Tightening Maneuver:
Begin with a gentle approach. Tighten the compression nut by hand until it feels snug. This often resolves minor leaks. If hand-tightening doesn’t suffice, use two wrenches to apply gentle, incremental tightening.
Avoid overtightening, as this is a common cause of leaks. Overtightening can crush the olive (the compression ring), damage the pipe, and even cause the fitting to crack. Use a gradual and controlled approach. A common guideline is to tighten the nut an additional 1/4 to 1/2 turn beyond hand-tight. However, this is a general guideline, and the specific tightening requirements may vary depending on the manufacturer‘s instructions and the size and type of fitting.
After tightening, carefully inspect for any signs of leakage. If the leak persists, proceed to the next step.
Step 4: Disassembly and Inspection:
If tightening doesn’t resolve the leak, it’s time for a more in-depth repair. Use two wrenches to carefully loosen the compression nut. Apply steady pressure and avoid using excessive force to prevent damaging the pipe or fitting. Once loosened, remove the nut and the olive from the fitting.
Examine the olive closely for any signs of damage, such as cracks, deformation, or excessive wear and tear. A damaged olive can prevent the fitting from creating a proper seal. If the olive is damaged, it will need to be replaced.
Inspect the pipe and the inside of the fitting body for any debris, corrosion, or other obstructions that could be interfering with the seal. Clean the pipe and fitting thoroughly to remove any obstructions. Use a clean cloth or a pipe brush to remove any debris.
Step 5: Reassembly and Testing:
Reinstall the olive onto the pipe, ensuring it’s properly seated. Then, carefully slide the fitting body over the pipe and olive. Tighten the nut to the manufacturer‘s specifications (usually a slight turn past hand-tight).
Turn on the water supply and carefully monitor the fitting for any signs of leakage. Observe the fitting for a period of time to ensure the leak has been completely resolved. If the leak continues or returns, there may be an underlying issue with the plumbing system that requires further investigation.
Step 6: When in Doubt, Call in the Professionals
If your repair attempts are unsuccessful, or if you encounter any difficulties or concerns, it’s crucial to call a qualified plumber. Attempting complex repairs without proper knowledge and experience can be risky and potentially worsen the problem.
Plumbers possess the expertise, experience, and specialized tools to diagnose and repair complex plumbing issues effectively. They can accurately assess the situation, identify the root cause of the leak, and perform a safe and efficient repair.
A professional plumber can also provide valuable advice on preventative maintenance and plumbing best practices to help you avoid future plumbing problems.
How to Fix a Brake Line With a Compression Fitting
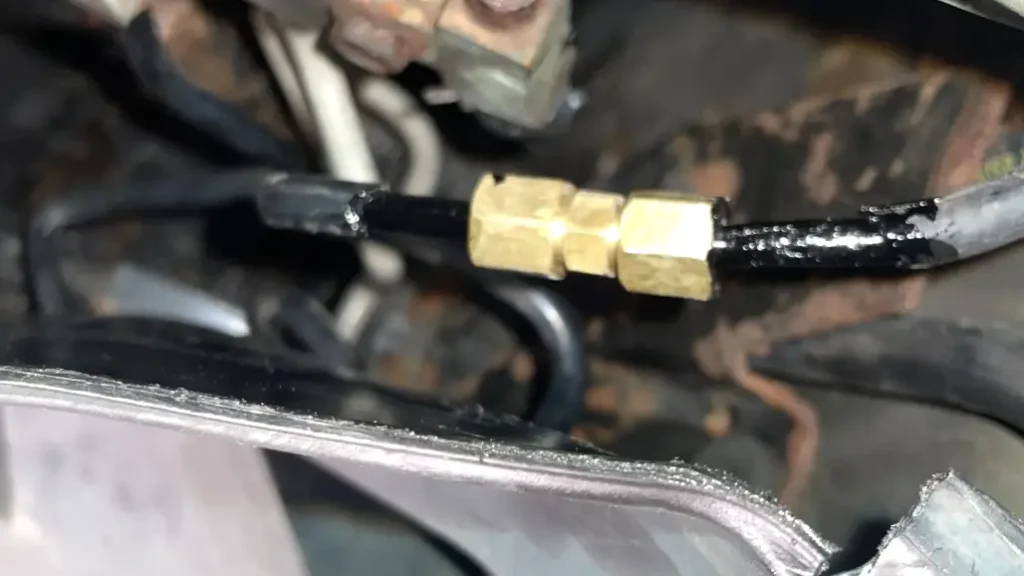
Repairing a damaged brake line with a compression fitting is a relatively straightforward process that can be performed by many DIY mechanics. However, it’s crucial to understand that brake systems are critical safety components, and any repairs should be done with utmost care and attention to detail.
Here is the all-in-one guide about compression fitting for brake line repair:
Step 1: Identify and Assess the Damage
First, we must accurately locate the damaged section of the brake line. This might involve a visual inspection for leaks, signs of rubbing, or obvious cuts. We should also check for any signs of corrosion or weakening around the fitting itself. Once the damaged area is identified, we need to assess the extent of the damage. If the line is simply leaking at the fitting, a repair might be possible. However, if the line itself is severely damaged or corroded, replacement of the entire section may be necessary.
Step 2: Gather the Necessary Tools and Materials
Before we begin the repair, we must gather all the necessary tools and materials. This will typically include:
- New brake line: The length of the new line will depend on the extent of the damage.
- Compression fittings: These will be specific to the size and type of brake line being used.
- Flare nut wrenches: These are essential for properly tightening the fittings without damaging the line.
- Pipe cutter or hacksaw: To cut the damaged section of the brake line.
- Brake fluid: To refill the brake system after the repair is complete.
- Clean rags: To clean the area around the repair and absorb any spilled brake fluid.
- Safety glasses and gloves: To protect your eyes and hands.
Step 3: Prepare the Brake Line for Repair
Before we can install the new fittings, we must prepare the brake line itself. This involves:
- Cutting the damaged section: Using a pipe cutter or hacksaw, carefully cut the damaged section of the brake line.
- Deburring the cut ends: Remove any sharp edges from the cut ends of the line to prevent them from damaging the fittings.
- Cleaning the line: Clean the inside and outside of the line with a clean rag to remove any dirt or debris.
Step 4: Install the Compression Fittings
Now we can install the new compression fittings. This process typically involves:
- Inserting the line into the fitting: Carefully insert the prepared brake line into the fitting.
- Tightening the nut: Using a flare nut wrench, tighten the nut on the fitting to the manufacturer‘s specifications.
- Checking for leaks: After tightening the nut, carefully inspect the fitting for any signs of leaks.
Step 5: Bleed the Brakes
After the repair is complete, we must bleed the brakes to remove any air that may have entered the system during the repair process. This is typically done by:
- Opening the bleeder valve: Open the bleeder valve on one of the brake calipers.
- Pumping the brake pedal: Have an assistant pump the brake pedal several times.
- Closing the bleeder valve: Close the bleeder valve while the pedal is still depressed.
- Repeating the process: Repeat this process for each of the brake calipers.
Step 6: Test the Brakes
Once the brakes have been bled, we must test them to ensure they are functioning properly. This can be done by:
- Driving the vehicle: Drive the vehicle slowly and carefully to test the brakes.
- Checking for any unusual noises or vibrations: Listen for any unusual noises or vibrations coming from the brake system.
Step 7: Inspect and Maintain
After the repair, we should regularly inspect the brake lines for any signs of wear or damage. This will help to prevent future problems and ensure the safe operation of the vehicle. We should also have the brake system serviced by a qualified technician at the recommended intervals.
Brake Line Repair Compression Fitting
While compression fittings are commonly used in plumbing applications, their use in brake line repair is generally not recommended and may not be safe or legal. Brake systems operate under high pressure and require robust, reliable connections to ensure consistent and effective braking performance. Compression fittings may not provide the necessary strength, durability, and vibration resistance for brake lines, potentially leading to leaks, failures, and safety hazards.
Potential Risks:
- Leaks: Compression fittings may not create a sufficiently strong seal to withstand the high pressures within a brake system. This can lead to fluid leaks, which can significantly impair braking performance.
- Vibration and Loosening: The constant vibrations experienced by brake lines during vehicle operation can loosen compression fittings, leading to leaks and potential brake failure.
- Safety Concerns: Brake failure can have serious consequences, including accidents and injuries. Using non-standard or potentially unreliable repair methods can increase the risk of brake failure.
Recommended Repair Methods:
The safest and most reliable approach is to have a qualified mechanic repair or replace damaged brake lines. Professional mechanics typically use specialized tools to flare the ends of the brake lines and create a secure, leak-proof connection.6
Important Considerations:
- Safety First: Always prioritize safety when working on any part of your vehicle’s braking system.
- Consult a Professional: If you are unsure about any aspect of brake line repair, consult with a qualified mechanic.
- Follow Local Regulations: Be aware of and comply with all applicable local regulations and safety standards regarding brake system repairs.
Conclusion
By following these steps, you can effectively troubleshoot and fix a leaky compression fitting. Remember to always prioritize safety and consider consulting with a qualified plumber if you encounter any difficulties.
Regularly inspecting your plumbing system for leaks can help prevent costly water damage and ensure the longevity of your pipes and fittings. For reliable and high-quality compression fittings for your next project, consider DF Hydraulics. As a leading manufacturer, we offer a wide range of fittings designed to meet the highest industry standards.


