Sealing NPT (National Pipe Thread) fittings correctly is essential for preventing leaks in various fluid and gas transfer systems. NPT fittings, with their tapered threads, are designed to create a mechanical seal, but they often require additional sealants to ensure a leak-proof connection. Understanding the proper sealing techniques is crucial for both DIY enthusiasts and professionals.
This blog post will guide you through the step-by-step process of sealing NPT fittings effectively. We’ll cover everything from inspecting and preparing the fittings to applying the correct sealant and testing the connection. By following these guidelines, you can ensure a reliable and leak-free system, minimizing the risk of costly repairs and downtime.
Why NPT Fitting Needs Sealant
NPT (National Pipe Thread) fittings, despite their tapered design, require sealant to ensure a reliable, leak-free connection. While the tapered threads create a mechanical seal as they are tightened, they do not provide a perfect seal on their own. The imperfections in the thread surfaces, even when machined to standard tolerances, create microscopic gaps that can allow fluid or gas to escape under pressure. Sealants fill these gaps, creating a barrier that prevents leaks and ensures a tight seal.
Moreover, NPT threads are often used in systems that experience vibrations, temperature fluctuations, or pressure variations. These conditions can cause the threads to loosen or shift slightly, compromising the mechanical seal. Sealants act as a lubricant during assembly, preventing galling and ensuring proper tightening. They also provide a flexible seal that can accommodate minor movements or changes in the system, maintaining a leak-free connection over time.
- Microscopic Gaps:
- Thread imperfections: Even machined threads have tiny gaps.
- Fluid/gas escape: Pressure forces substances through these gaps.
- System Dynamics:
- Vibrations: Can loosen thread engagement.
- Temperature fluctuations: Cause thread expansion/contraction.
- Pressure variations: Can stress thread connections.
- Lubrication: Sealants prevent galling during assembly.
- Flexibility: Sealants accommodate minor movements.
How to Seal NPT Fittings?
Sealing NPT (National Pipe Thread) fittings effectively is crucial for preventing leaks in fluid and gas transfer systems. Due to their tapered design, proper sealing relies on a combination of thread engagement and sealant application. Here’s a detailed guide on how to seal NPT fittings correctly:
Step 1. Inspect and Prepare the Fittings
Begin by thoroughly inspecting both the male and female NPT fittings for any damage or defects. Check for damaged threads, cracks, or corrosion, as these can compromise the seal. Ensure the fittings are clean and free from any debris, old sealant, or contaminants that could interfere with the sealing process. Clean the threads using a wire brush or a clean cloth.
Proper preparation is essential for a reliable seal. Inspect the threads for any imperfections that could lead to leaks. Ensure the fittings are dry and free from any moisture or oil, as these can affect the adhesion of thread sealants. Cleanliness and inspection are paramount for a leak-free connection.
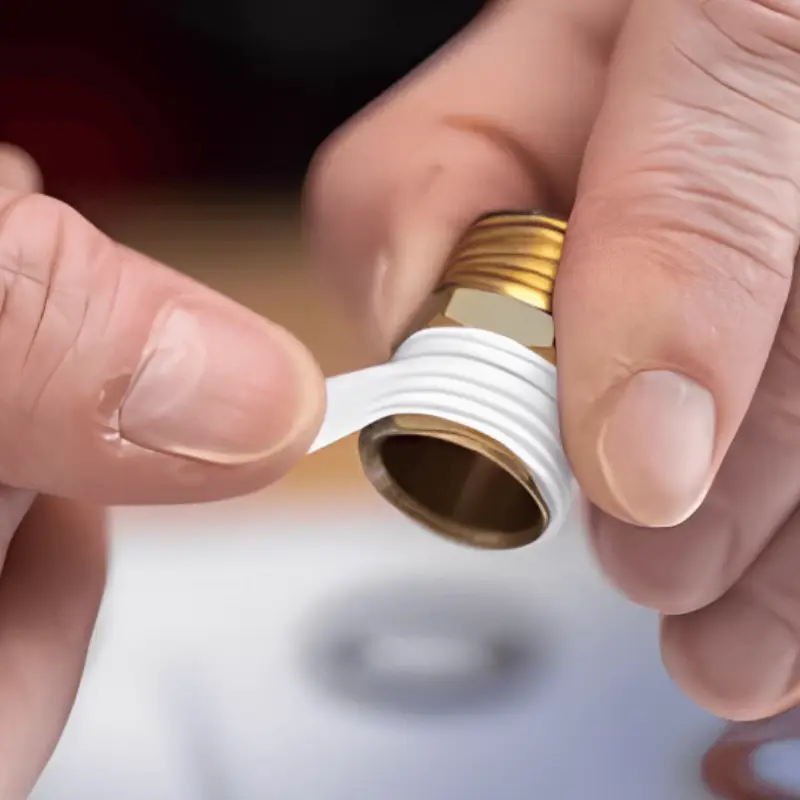
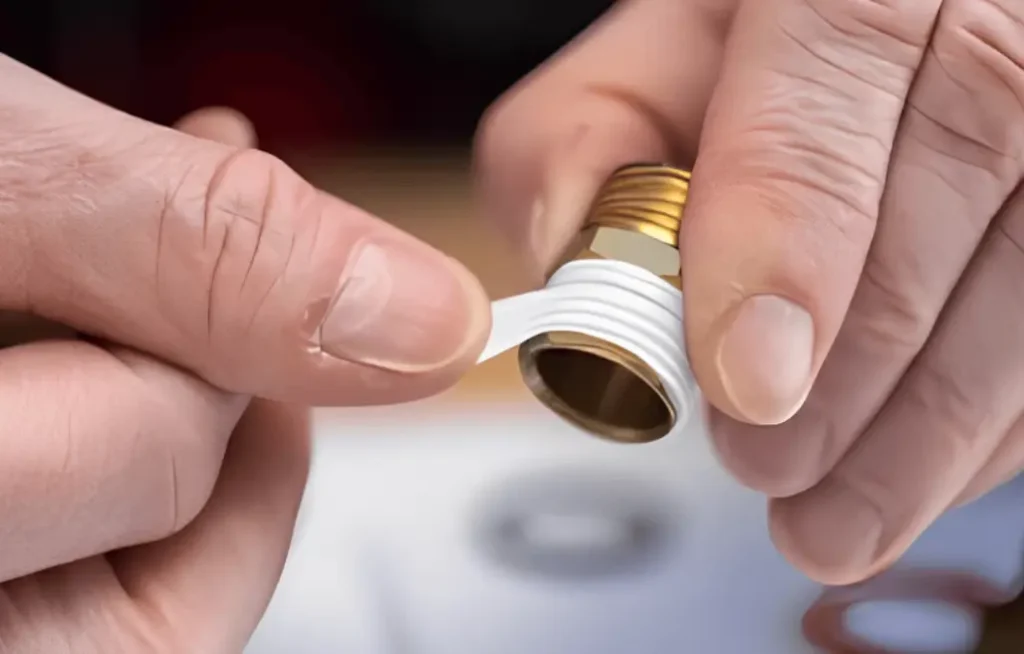
Step 2. Apply Thread Sealant or Teflon Tape
Select an appropriate thread sealant or Teflon tape that is compatible with the fluid or gas being conveyed and the operating conditions. Apply the sealant or tape to the male NPT threads only. For Teflon tape, wrap it clockwise around the threads, starting at the second thread and overlapping by 50%. Ensure the tape is applied evenly and tightly, covering all threads. For thread sealant, apply an even coat to the male threads, ensuring complete coverage.
Proper application of the sealant or tape is crucial for a leak-free seal. Avoid applying too much sealant or tape, as this can lead to over-tightening or contamination of the system. Follow the manufacturer’s instructions for the specific sealant or tape being used. Even application is key.
Step 3. Assemble and Tighten the Fittings
Carefully align the male and female NPT fittings and begin threading them together by hand. Once hand-tight, use a wrench to tighten the fittings further. Apply the recommended torque specified by the manufacturer or industry standards. Avoid over-tightening, as this can damage the threads or fitting body. Ensure the fittings are properly aligned and seated.
Proper tightening is essential for creating a reliable seal. Use a torque wrench to ensure the fittings are tightened to the correct specifications. Over-tightening can lead to damaged threads, while under-tightening can result in leaks. Proper alignment is also essential to prevent cross-threading and damage.
Step 4. Test the Sealed Connection
After assembling and tightening the fittings, test the sealed connection for leaks. Pressurize the system to the operating pressure and carefully inspect the connection for any signs of leakage. Use a leak detection solution or a dry cloth to check for moisture or fluid seepage. If a leak is detected, re-evaluate the sealing method and consider alternative sealants or tapes.
If the connection holds pressure without leaks, run the system under normal operating conditions for a period of time to ensure the repair’s durability. Monitor the connection for any signs of leakage or deterioration. Proper testing and monitoring are essential to verify the seal’s effectiveness and prevent future leaks.
How to Seal NPT Brake Fittings?
Sealing NPT (National Pipe Thread) brake fittings is crucial for ensuring the integrity and safety of a vehicle’s braking system. Due to the high-pressure nature of brake systems, a reliable, leak-free seal is essential. Here’s a detailed guide on how to properly seal NPT brake fittings:
Step 1. Inspect and Prepare the Fittings
Begin by thoroughly inspecting both the male and female NPT brake fittings for any damage or defects. Carefully examine the threads for signs of wear, corrosion, or damage, as these can compromise the seal. Ensure the fittings are clean and free from any debris, old sealant, or contaminants that could interfere with the sealing process. Clean the threads using a wire brush or a clean, lint-free cloth.
Proper preparation is essential for a reliable brake system seal. Inspect the threads for any imperfections that could lead to leaks or system failures. Ensure the fittings are dry and free from any moisture or brake fluid, as these can affect the adhesion of thread sealants. Cleanliness and inspection are paramount for a leak-free and safe connection.
Step 2. Apply Brake-Specific Thread Sealant
Select a thread sealant specifically designed for brake systems. These sealants are formulated to withstand the high pressures and temperatures encountered in brake applications and are compatible with brake fluids. Apply the sealant sparingly and evenly to the male NPT threads only. Ensure complete coverage of the threads, but avoid applying excessive sealant, which could contaminate the brake fluid or clog the system.
Proper application of the brake-specific thread sealant is crucial for a leak-free and safe seal. Avoid using generic thread sealants, as they may not be compatible with brake fluids or withstand the operating conditions. Follow the manufacturer’s instructions for the specific sealant being used. Even and controlled application is key to prevent system contamination and ensure a reliable seal.
Step 3. Assemble and Tighten the Fittings
Carefully align the male and female NPT brake fittings and begin threading them together by hand. Once hand-tight, use a wrench to tighten the fittings further. Apply the recommended torque specified by the vehicle manufacturer or industry standards. Avoid over-tightening, as this can damage the threads or fitting body, potentially leading to leaks or system failures. Ensure the fittings are properly aligned and seated.
Proper tightening is essential for creating a reliable brake system seal. Use a torque wrench to ensure the fittings are tightened to the correct specifications. Over-tightening can lead to damaged threads and potential system failure, while under-tightening can result in leaks and compromised braking performance. Proper alignment is also crucial to prevent cross-threading and damage.
Step 4. Test the Sealed Connection
After assembling and tightening the fittings, test the sealed connection for leaks. Pressurize the brake system to the operating pressure and carefully inspect the connection for any signs of leakage. Use a brake fluid-compatible leak detection solution or a dry, lint-free cloth to check for moisture or fluid seepage. If a leak is detected, re-evaluate the sealing method and consider alternative sealants or fittings.
If the connection holds pressure without leaks, thoroughly test the brake system under simulated operating conditions to ensure the repair’s durability. Monitor the connection for any signs of leakage or deterioration. Proper testing and monitoring are essential to verify the seal’s effectiveness and ensure the safety of the braking system.
Conclusion
In conclusion, sealing NPT fittings effectively involves proper inspection, preparation, and the correct application of thread sealant or Teflon tape. Ensuring clean threads and appropriate tightening torque are essential for a leak-free connection. Regular testing and monitoring further guarantee the seal’s integrity, preventing costly leaks and system failures.
The tapered design of NPT threads, while creating a mechanical seal, necessitates sealants to fill microscopic gaps and accommodate system dynamics. Proper sealing methods ensure longevity and reliability, especially in high-pressure applications. Understanding these principles is crucial for any application using NPT fittings.
For reliable NPT fittings and expert sealing solutions, request a quote from DF Hydraulics today. We offer a comprehensive range of high-quality fittings tailored to your specific needs. Partner with us for efficient and leak-free fluid transfer systems. Get in touch to discuss your requirements and receive a personalized quotation.


