Removing a compression fitting may seem like a daunting task, but with the right approach and tools, it’s quite manageable. Whether you are working with copper pipes, plastic pipes, or PEX tubing, knowing the proper steps is essential to prevent damage to your pipes and fittings.
In this article, I’ll walk you through everything you need to know about how to remove a compression fitting, including when and how to do it, along with some tips based on my personal experience.
If you have any doubts or need further clarification, feel free to contact us. We’re here to help!
What is a Compression Fitting?
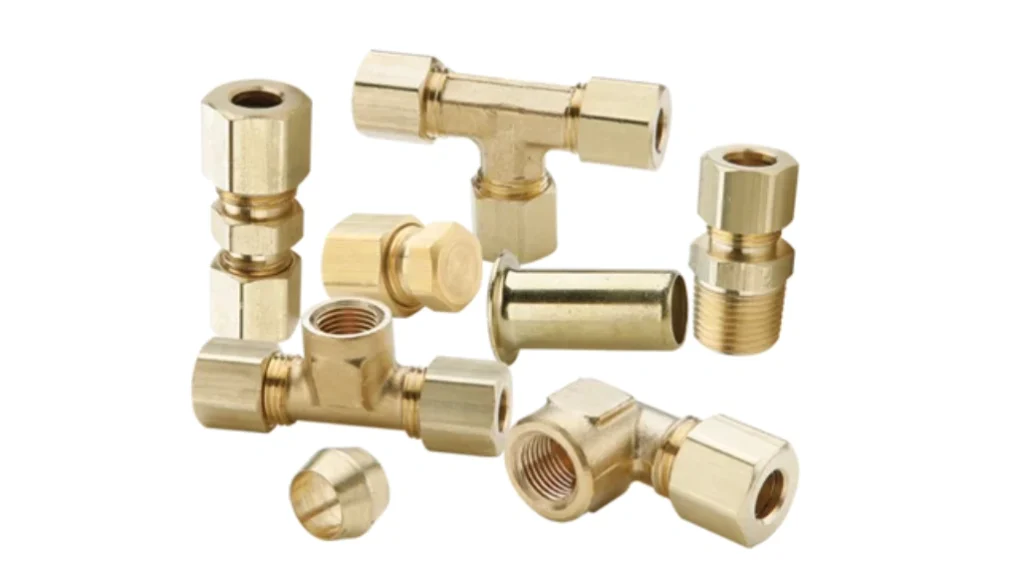
Compression fittings are widely used in plumbing to connect pipes and tubing without the need for welding or soldering. These fittings are designed to create a tight, leak-proof seal when compressed over a pipe. They consist of a compression nut, a compression ring (also known as a ferrule), and the fitting body.
Common Sizes for Compression Fittings:
Compression fittings come in various sizes, typically ranging from 1/8 inch to 2 inches in diameter, to accommodate different plumbing needs.
The key feature of these fittings is that they are easy to install and remove, making them ideal for both professional plumbers and DIY enthusiasts. However, when it’s time to replace or repair, knowing how to remove a compression fitting is crucial.
| Title | Nominal Size | Tube OD (mm) | Ferrule ID (mm) | Nut Length (mm) | Maximum Working Pressure (bar) |
|---|---|---|---|---|---|
| Mini Compression Fitting | 1/8″ | 4 | 3 | 15 | 160 |
| Standard Compression Fitting | 1/4″ | 6.35 | 5.5 | 20 | 140 |
| Large Compression Fitting | 1/2″ | 12.7 | 11 | 25 | 120 |
| Extra-Large Compression Fitting | 3/4″ | 19.05 | 17 | 30 | 100 |
Some key features of compression fittings:
- Ease of Installation: Compression fittings are relatively easy to install compared to some other plumbing connection methods, such as soldering. This makes them a popular choice for DIYers and professionals alike.
- Reusability: In many cases, compression fittings can be reused if they are in good condition. However, it’s important to inspect the olive and other components for any signs of wear or damage before reuse.
- Versatility: They can be used with different types of pipes, including copper, plastic (such as PVC, CPVC), and PEX, making them a versatile option in plumbing systems.
Common Usage Scenarios
- Residential Plumbing: Compression fittings are commonly used in household plumbing systems for connecting pipes in kitchens, bathrooms, and laundry rooms. For example, they are used to connect faucet supply lines to the main water pipes, as well as for connecting pipes in the shower and bathtub systems.
- Commercial Plumbing: In commercial buildings, compression fittings are used in plumbing systems for offices, restaurants, and hotels. They are often used in larger – scale applications, such as connecting pipes in a building’s main water supply or drainage systems.
- Irrigation Systems: Compression fittings are also used in irrigation systems to connect pipes that supply water to lawns and gardens. They are popular in this application due to their ease of installation and ability to create a reliable seal.
When to Remove Compression Fittings
Repair or Replacement
If a pipe connected by a compression fitting is damaged, leaking, or needs to be replaced, the compression fitting must be removed. For example, if a copper pipe has a small hole due to corrosion near a compression fitting, the fitting needs to be removed to replace the damaged section of the pipe.
System Reconfiguration
When you want to change the layout of your plumbing system, such as adding a new fixture or rerouting pipes, you’ll need to remove compression fittings to make the necessary changes.
Upgrading Components
If you’re upgrading to a new faucet, showerhead, or other plumbing fixture that requires a different connection method or size, you may need to remove the existing compression fittings.
How to Remove a Compression Fitting
Removing a compression fitting can vary slightly depending on the type of pipe and fitting. Below, I’ll explain how to remove compression fittings from different materials, including copper pipes, plastic pipes, and PEX tubing.
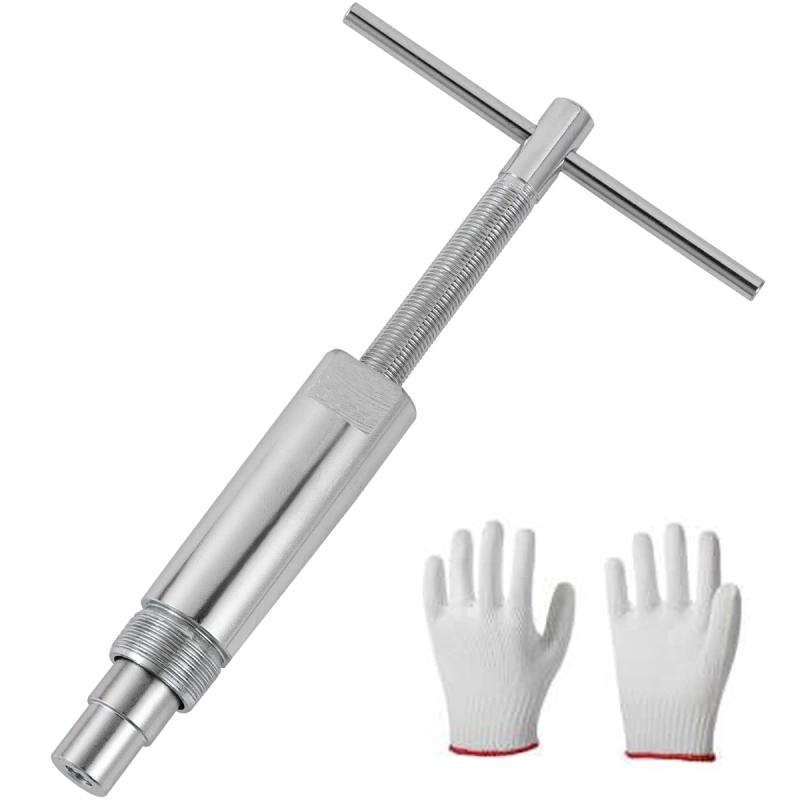
Step 1: Compression Fitting Removal Tool
Before you start, make sure you have the following tools:
- Wrenches (adjustable or pipe wrenches)
- Pliers
- Compression fitting removal tool (optional)
- Pipe cutter (if necessary)
- Teflon tape or pipe sealant (for reinstallation)
- A cloth (to catch any residual water or debris)
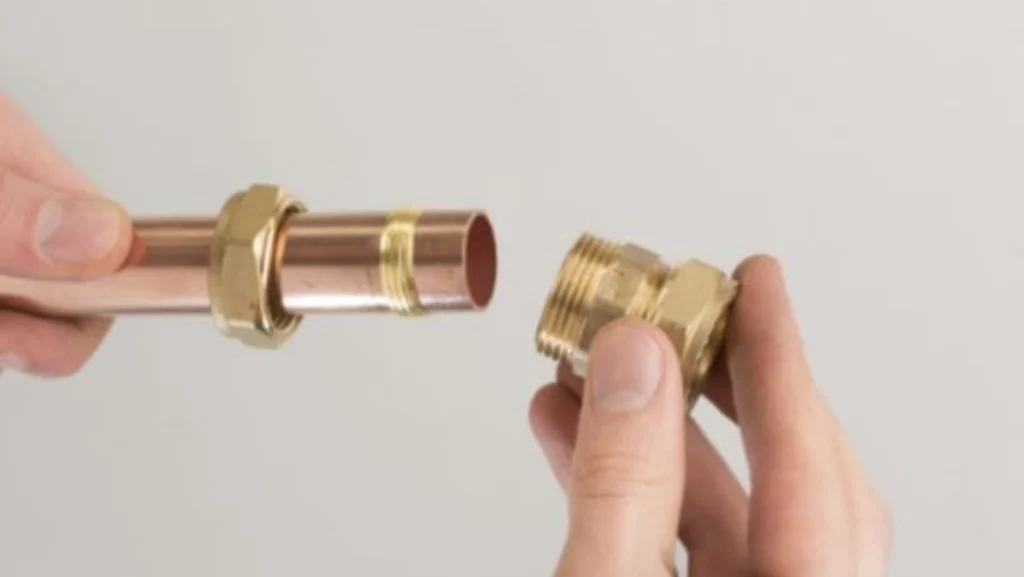
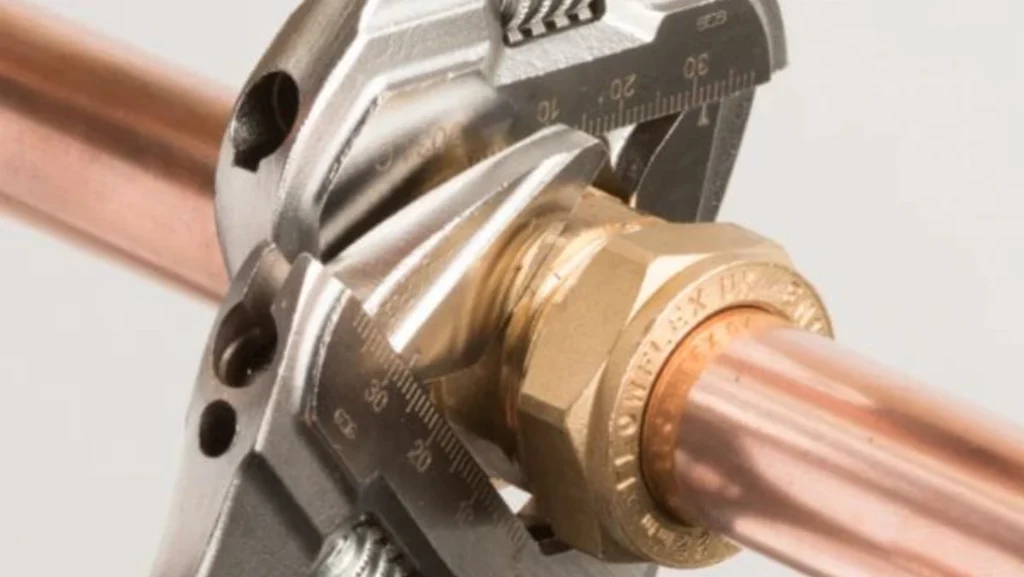
Step 2: How to Remove a Compression Fitting from a Copper Pipe
Copper pipes are common in plumbing, and removing compression fittings from them requires a careful approach.
- Turn off the water supply: Before starting any plumbing work, shut off the water supply to prevent leaks or flooding.
- Loosen the compression nut: Use an adjustable wrench to loosen the compression nut that holds the fitting in place. Turn the nut counterclockwise until it’s completely free.
- Remove the compression ring (ferrule): Once the nut is off, you may need to remove the compression ring. If it’s stuck, you can use pliers or a specialized tool to pry it off.
- Check the pipe: Inspect the copper pipe for any damage or corrosion that might need attention before reattaching a new fitting.
Step 3: How to Remove a Compression Fitting from a Plastic Pipe
Plastic pipes (such as PVC or CPVC) require a gentle touch to avoid cracking the pipe.
- Turn off the water supply: Just as with copper pipes, it’s important to turn off the water before starting.
- Loosen the compression nut: Use a wrench to unscrew the compression nut from the fitting. Be careful not to apply too much force, as plastic is more prone to damage than metal.
- Remove the compression ring: Once the nut is off, remove the ferrule. You may need to wiggle it a bit if it’s tightly seated.
- Check the pipe: Inspect the plastic pipe for any signs of wear or damage.
Step 4: How to Remove a Compression Fitting from a PEX Pipe
PEX pipes are flexible and easy to work with, but you’ll need a special tool to remove compression fittings from PEX.
- Turn off the water supply: As with any plumbing task, start by turning off the water supply.
- Use a PEX removal tool: PEX-specific tools are designed to release the compression ring without damaging the pipe. Insert the tool and press the handles to free the ring.
- Loosen the compression nut: Use an adjustable wrench to unscrew the compression nut from the fitting.
- Remove the compression ring: Carefully remove the ferrule from the PEX pipe.
- Inspect the pipe: Check the PEX pipe for any damage before reusing it.
Step 5: How to Remove Compression Fittings Without Tools
In some cases, you might need to remove a compression fitting without tools, especially if the fitting is already loose or easy to access.
- Twist the compression nut by hand: If the compression nut is not too tight, you can twist it off by hand.
- Pull the fitting apart: Once the nut is removed, gently pull apart the fitting from the pipe. You may be able to remove the ferrule by hand as well, but if it’s stuck, use pliers for a better grip.
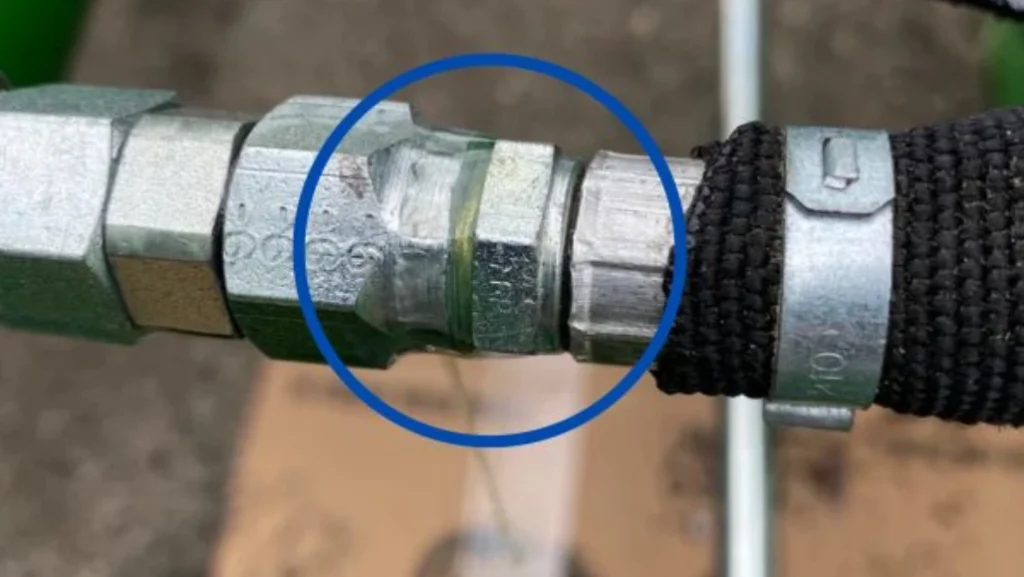
Precautions During Removal
- Wear Protective Gear: Always wear safety glasses to protect your eyes from any flying debris, especially when using tools to remove compression fittings. Gloves can also be worn to protect your hands from sharp edges and potential cuts.
- Avoid Over – Tightening or Over – Loosening: When loosening the compression nut, be careful not to over – tighten the wrench, as this can cause the nut to strip or the fitting to be damaged. Similarly, when reinstalling a fitting, don’t over – tighten it, as this can also lead to damage and may cause the pipe to crack.
- Be Gentle with the Pipes: Different types of pipes have different levels of durability. Copper pipes can be scratched or dented, plastic pipes can be cracked, and PEX pipes can be deformed. Handle the pipes with care during the removal process to avoid any damage that could lead to future leaks or other plumbing issues.
- Use the right tools: Using the appropriate tools for each type of pipe is crucial to avoid damaging your plumbing.
- Inspect for damage: After removing a fitting, always check the pipe for any signs of wear or damage.
- Check for leaks: If you’re reusing a fitting, make sure to check for leaks after reassembly.
How to Remove a Compression Fitting From a Copper Pipe
Removing a compression fitting from a copper pipe can be done with the right tools and techniques. Here’s a step-by-step guide:
- Safety First: Turn off the water supply valve to the area where you’re working. This prevents water from gushing out when you disconnect the fitting.
- Loosen the Compression Nut: Use an appropriate wrench (usually an adjustable wrench) to loosen the compression nut by turning it counterclockwise.
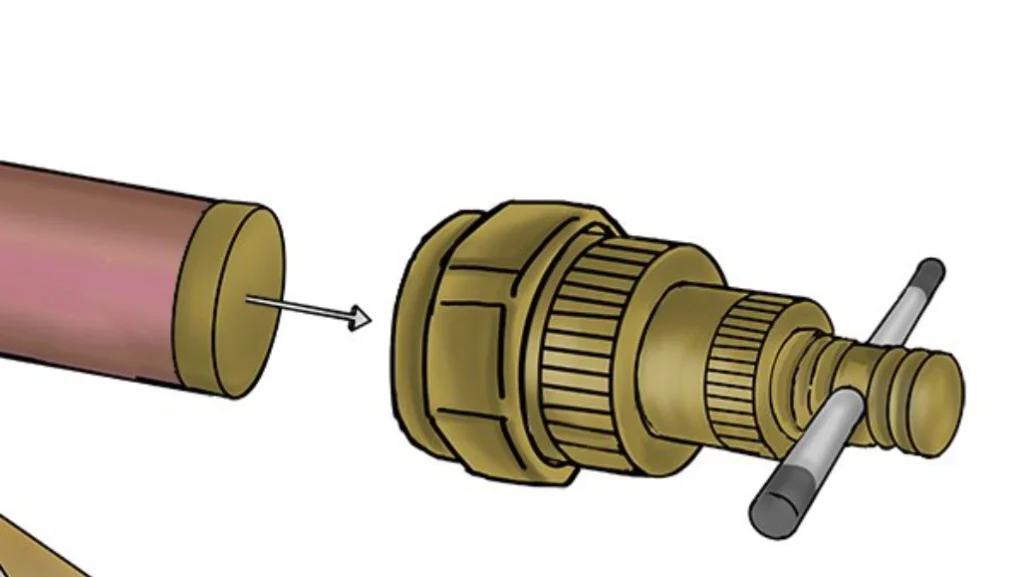
- Remove the Compression Nut: Once loosened, continue turning the nut counterclockwise until it’s completely off the fitting body.
- Slide Off the Compression Ring: Carefully slide the compression ring (also known as an olive) off the copper pipe. You may need to use a small flathead screwdriver to help pry it off if it’s stuck.
- Remove the Pipe: Gently pull the copper pipe out of the fitting body.
- Inspect the Fitting: Check the fitting body for any damage or wear and tear. If necessary, replace the fitting.
- Clean the Pipe: Clean the end of the copper pipe to remove any debris or burrs. This will ensure a proper seal when you install a new fitting.
Important Notes:
- Wear safety glasses to protect your eyes from any debris or water that may splash.
- If you encounter any difficulties or are unsure about any step, it’s always best to consult with a qualified plumber.
- Remember to turn the water supply back on after you have finished the repair.
By following these steps, you can safely and effectively remove a compression fitting from a copper pipe.
How to Remove a Pex Compression Fitting
Removing a PEX Compression Fitting
Here’s a step-by-step guide on how to remove a PEX compression fitting:
1. Safety First:
- Turn off the water supply: Locate the shut-off valve for the affected area and turn it off completely.
- Relieve pressure: Open a faucet downstream from the fitting to release any remaining water pressure.
2. Gather Your Tools:
- Channel locks or pliers: To grip and twist the PEX tubing.
- Utility knife or sharp blade: To carefully cut the compression ring.
- Heat gun (optional): Can help soften the PEX for easier removal.
3. Cut the Compression Ring:
- Locate the ring: Identify the metal compression ring around the PEX tubing.
- Cut the ring: Carefully use the utility knife to cut the ring completely through. Be cautious not to nick the PEX tubing itself.
4. Remove the Ring:
- Slide or pry: Gently slide the cut ring off the PEX tubing. You may need to use a small flathead screwdriver to help pry it off.
5. Remove the PEX Tubing:
- Heat the tubing (optional): If the tubing is stubborn, use a heat gun to gently warm the area around the fitting. This can soften the PEX and make it easier to remove.
- Twist and pull: Grip the PEX tubing firmly with the channel locks or pliers. Twist and pull gently to remove it from the fitting body.
6. Inspect and Clean:
- Inspect the fitting: Check the fitting body for any damage or wear. Replace if necessary.
- Clean the tubing: Clean the end of the PEX tubing to remove any debris or burrs before installing a new fitting.
Important Notes:
- Be gentle: Avoid excessive force, as this can damage the PEX tubing or the fitting.
- Wear safety glasses: Protect your eyes from any debris that may fly during the removal process.
- If you’re unsure about any step, consult a professional plumber.
By following these steps, you can safely and effectively remove a PEX compression fitting
Conclusion
Removing a compression fitting is a manageable task if you follow the right steps and use the correct tools. Whether you’re working with copper, plastic, or PEX pipes, understanding the removal process will make your plumbing tasks easier and more efficient.
If you are interested in our products or need custom fittings, feel free to contact us. We offer a full range of fittings and solutions to meet your needs. You can also visit our homepage or request a product catalog for more information.
FAQs About Remove Compression Fitting
How do you remove a compression valve fitting?
To remove a compression valve fitting, turn off the water supply, loosen the compression nut with a wrench, remove the compression ring, and carefully separate the valve from the pipe. Use a PEX removal tool if working with PEX pipes.
Are compression fittings removable?
Yes, compression fittings are removable. They are designed to be taken apart and reused in most cases. However, if the compression ring or fitting is damaged, it should be replaced.
How to remove a compression fitting tool?
A compression fitting removal tool helps to release the compression ring from the pipe without damaging it. You can purchase these tools at most hardware stores. Simply insert the tool between the ferrule and the pipe and press to release the ring.
How to get the old compression ring off?
To remove an old compression ring, use pliers to grip the ferrule and gently twist or pull it off the pipe. If it’s stuck, try using a specialized removal tool or a pipe cutter if necessary.
How tight should you tighten a compression fitting?
Compression fittings should be tightened firmly but not excessively. Over-tightening can damage the pipe or fitting, while under-tightening can lead to leaks. Aim for a snug fit, where the compression nut is hand-tightened and then given a quarter turn with a wrench.
Barb vs Compression Fittings: What’s the Difference?
Barb fittings use barbed ends to secure hoses, while compression fittings use a compression ring to create a tight seal. Compression fittings are often used for plumbing and gas lines, while barb fittings are more common for flexible hoses.
Where to buy fittings?
If you’re looking for high-quality custom fittings, feel free to contact us at Dingfeng. We offer a complete range of fittings and are happy to provide you with a product catalog. Reach out to us for all your fitting needs!


