
When it comes to working with hydraulic systems or assembling piping, measuring the right fittings is crucial. One such fitting is the ORB (O-Ring Boss) fitting, a common connector used in fluid systems.
Today, we will walk you through how to measure ORB fittings accurately and address key factors to consider. Whether you’re assembling a new system or replacing an old fitting, understanding how to measure ORB fittings will help ensure optimal functionality.
If you have any questions regarding the content, feel free to contact us at any time.
What is an ORB Fitting?
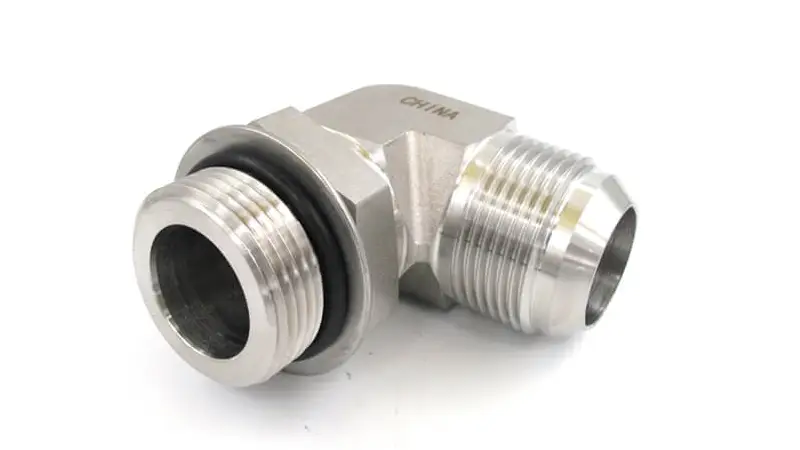
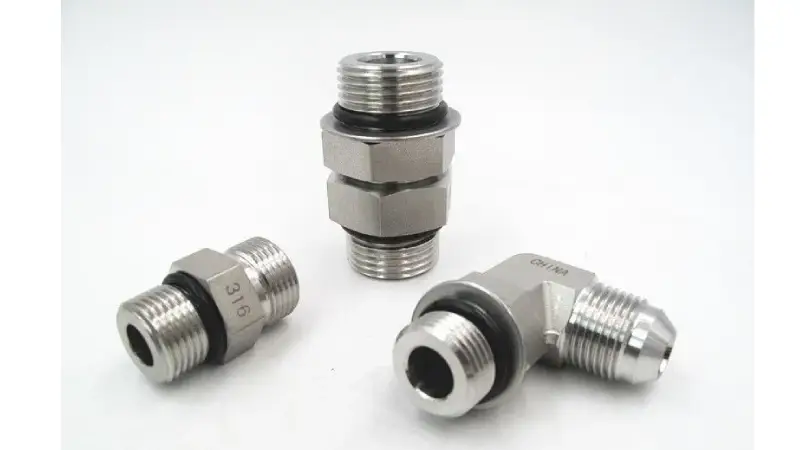
An ORB fitting, short for O-Ring Boss fitting, is a type of hydraulic fitting commonly used to connect two pipes or hoses in fluid systems. These fittings are designed to create a leak-proof seal by using an O-ring as the sealing element, ensuring reliable performance even under high-pressure conditions.
ORB fittings come in various sizes and types, including male and female versions. They are typically made from materials such as steel, stainless steel, and brass, offering resistance to wear and corrosion. The fitting sizes are defined by the outer diameter (OD) and the thread pitch.
ORB Fitting Sizes
ORB fittings come in a wide range of sizes, and selecting the right one depends on the specific application and system requirements. Here is a summary of common ORB fitting sizes:
| Size (Inches) | Metric Size (mm) | Common Use | ORB Fitting Type |
|---|---|---|---|
| 1/8″ | 6mm | Low-pressure fluid systems | Male/Female ORB |
| 1/4″ | 8mm | Hydraulic lines, medium pressure | Male/Female ORB |
| 3/8″ | 10mm | Common in machinery and vehicles | Male/Female ORB |
| 1/2″ | 12mm | Industrial systems | Male/Female ORB |
| 1″ | 25mm | High-flow hydraulic systems | Male/Female ORB |
How to Measure ORB Fittings
Measure ORB Fittings: Tools Needed
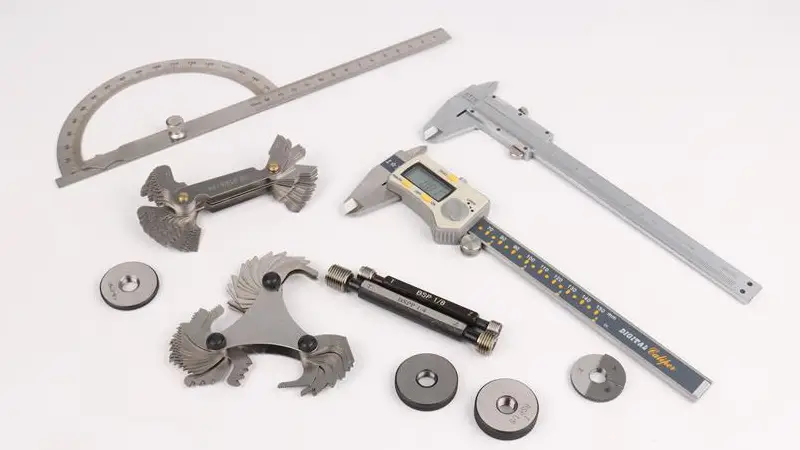
Before starting the measurement process, ensure you have the following tools:
- Caliper or Micrometer: For measuring external and internal diameters.
- Thread Gauge: This is used to determine thread pitch and type.
- Tape Measure: For overall length measurement.
- Surface Plate or Flat Surface: To ensure stability during measurements.
- Clean Cloth: To clean the fittings before measurement.
How to Measure ORB Fittings: Step-by-Step Measurement Process
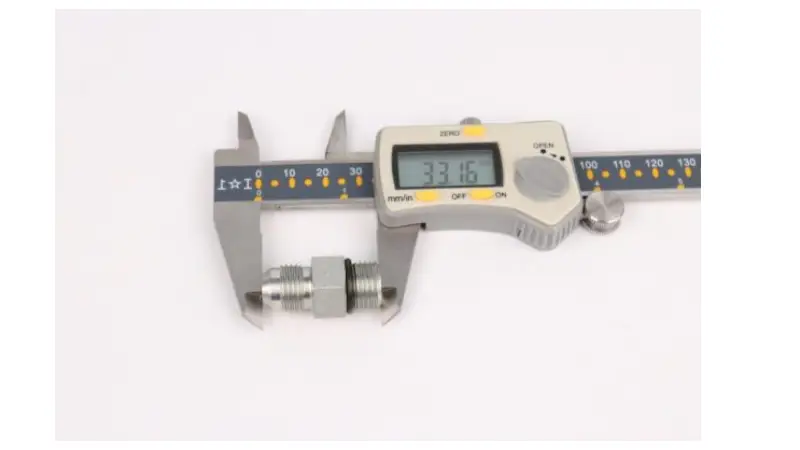
Step 1: Measure the Outside Diameter (OD)
The first step is to determine the outside diameter (OD) of the fitting. This is crucial for identifying the correct size and ensuring compatibility with other components.
- Procedure:
- Clean the fitting thoroughly with a clean cloth to remove any dirt or debris.
- Use a caliper or micrometer to measure across the widest part of the fitting’s body.
- Position the caliper correctly to avoid skewed measurements. Ensure it is perpendicular to the surface.
- Record the measurement in inches or millimeters as appropriate.
- Important Considerations:
- Double-check your measurements by taking multiple readings at different points around the fitting.
- Compare the measured OD with standard sizes (e.g., 1/4″, 3/8″, 1/2″) to identify the correct fitting size.
Step 2: Measure the Thread Pitch
Measuring the thread pitch is essential for ensuring that the fitting will mate properly with its counterpart.
- Procedure:
- Use a thread gauge to determine the number of threads per inch (TPI) or millimeter.
- Carefully align the gauge with the threads until you find a perfect match.
- Record the thread pitch along with the TPI or metric equivalent.
- Important Considerations:
- Pay attention to whether the thread is tapered or straight, as this can affect compatibility.
- Verify if the thread is SAE, JIC, NPT, or another specific standard.
Step 3: Measure the Thread Length
The length of the threads affects how deeply the fitting will screw into its counterpart and impacts the strength and sealing capability of the connection.
- Procedure:
- Use a caliper or tape measure to measure the length of the threaded portion from the base of the fitting to the end of the threads.
- Record the thread length in inches or millimeters.
- Important Considerations:
- Ensure the thread length is sufficient for the application. A full-length thread generally provides a stronger connection and better leak prevention.
- Check the manufacturer’s specifications for recommended thread engagement lengths.
Step 4: Check the O-Ring Groove
Measuring the O-ring groove ensures proper seating and sealing of the O-ring.
- Procedure:
- Use a caliper to measure the depth and width of the O-ring groove.
- Compare these measurements with the dimensions of the O-ring you plan to use.
- Important Considerations:
- An incorrectly sized groove can lead to sealing issues and potential leaks.
- Always choose an O-ring material compatible with the fluid type and operating temperature of the system.
Step 5: Verify the Fitting Type
Identifying whether you are dealing with a male or female ORB fitting is crucial for ensuring proper connections.
- Procedure:
- Examine the fitting to determine if it has external threads (male) or internal threads (female).
- Confirm the fitting type matches the intended connection point.
- Important Considerations:
- Misidentification can lead to improper connections and potential system failures.
- Refer to manufacturer guidelines or fitting charts to verify compatibility.
Important Considerations
O-Ring Compatibility
- Compatibility: Always use O-rings that are compatible with the fluid type and operating temperature of the system.
- Material Selection: Choose materials like Buna-N (Nitrile), Viton, EPDM, or others based on chemical resistance and temperature requirements.
Thread Compatibility
- Pitch Match: Ensure that the thread pitch on both the fitting and the connector matches perfectly to avoid leaks.
- Standard Compliance: Verify that both components comply with the same thread standards (SAE, JIC, etc.).
Pressure Rating
- System Requirements: Check the pressure rating of the ORB fitting to ensure it meets or exceeds the requirements of your system.
- Safety Margin: Consider using fittings with a higher pressure rating than necessary to provide a safety margin.
Installation Tips
- Proper Tightening: Use a torque wrench to tighten the fitting according to the manufacturer’s recommended torque values.
- Lubrication: Apply appropriate lubrication to the threads and O-ring to reduce friction and improve sealing effectiveness.
By following these detailed steps and considerations, you can accurately measure ORB fittings and ensure they are compatible with your system, leading to reliable and leak-free connections. If you encounter any uncertainties, consulting with the manufacturer or technical support can provide additional guidance.
How to Choose the Right ORB Fitting Type
When selecting an ORB fitting, consider the following factors:
- Application Pressure: Ensure the fitting can withstand the system’s maximum pressure. Higher pressures may require stronger materials or additional reinforcement.
- Size and Compatibility: Choose the correct size based on your system requirements. An ORB fitting that is too large or small will result in leaks.
- Material Type: Depending on your system’s environment, choose the appropriate material such as steel, stainless steel, or brass.
How to Install ORB Fittings
Step 1: Clean the Fitting and Connection Surface
Before installing the ORB fitting, ensure that both the fitting and the connection surface are free from dirt, debris, and old sealing material. Use a clean cloth and solvent to clean the surfaces.
Step 2: Install the O-Ring
Place the O-ring into the groove on the ORB fitting. Ensure the O-ring is seated properly to create a tight seal.
Step 3: Thread the Fitting
Carefully thread the ORB fitting into the corresponding connector. Avoid cross-threading by hand-tightening the fitting before using tools.
Step 4: Tighten with a Wrench
Use an appropriate wrench to tighten the fitting. Be cautious not to overtighten, as this can damage the threads or O-ring.
Step 5: Test for Leaks
After installation, perform a pressure test to check for leaks. If you detect a leak, tighten the fitting slightly or replace the O-ring if necessary.
Conclusion
Properly measuring and installing ORB fittings is crucial for ensuring the reliability of your fluid systems. By following these steps and using the correct tools, you can ensure accurate fitting measurements and prevent leaks. If you have any doubts or need assistance, don’t hesitate to contact us. For more product information or to request a product catalog, visit our website.
FAQs About How do you measure ORB fittings
What size is 10 ORB?
A 10 ORB fitting typically corresponds to a 3/8-inch fitting in imperial measurements or 10mm in metric measurements. This size is commonly used in medium-pressure hydraulic systems.
How to measure a fitting size?
To measure a fitting size, measure the outside diameter (OD), thread pitch, thread length, and the O-ring groove. These dimensions will determine the compatibility with your system.
How to measure a JIC fitting?
JIC (Joint Industrial Council) fittings can be measured by the outer diameter of the threads and the thread pitch. They are similar to ORB fittings but use a 37-degree flare rather than an O-ring.
How do I know if my ORB fitting is compatible with my system?
To ensure compatibility, check the dimensions of your ORB fitting, including the thread pitch, thread length, and O-ring size. It’s also essential to verify the pressure and temperature ratings match your system requirements.
Where to buy quick coupler irrigation fittings?
For customized quick coupler irrigation fittings, contact us at Dingfeng. We offer a full range of products, tailored to your needs, and can provide solutions for all your fitting requirements.


