Connecting hydraulic fittings correctly is crucial for the safety and performance of any hydraulic system. Improper connections can lead to leaks, pressure loss, and even catastrophic failures.
This guide will provide a step-by-step overview of the best practices for connecting various types of hydraulic fittings, including common tools and techniques. Whether you’re a seasoned professional or a DIY enthusiast, this guide will equip you with the knowledge to ensure reliable and leak-free connections.
How to Connect Hydraulic Fittings
Connecting hydraulic fittings can seem daunting, but with the right approach and attention to detail, it can be a straightforward process. This guide will walk you through each step, ensuring a secure and leak-free connection.
Step 1: Gather Your Tools and Materials
Before you begin, ensure you have all the necessary tools and materials. This typically includes:
- Hydraulic fittings: These are the specific fittings you’ll be using to connect your hydraulic system.
- Hydraulic hose: The hose that will be connected to the fittings.
- Cutting tool: A specialized hydraulic hose cutter is recommended for clean, precise cuts.
- Crimping tool: This tool is used to secure the fittings onto the hose.
- Wrench: You’ll need a wrench that matches the size of the fittings to tighten them securely.
- Soap or lubricant: This can help ease the process of sliding the hose onto the fitting.
- Tape measure: For accurate measurements of the hose.
- Safety glasses: To protect your eyes from any potential hazards.
- Gloves: To protect your hands from cuts and abrasions.
Step 2: Prepare the Hose
- Measure: Accurately measure the length of hose you need to connect the fittings. Ensure you have a bit of extra length for bending and maneuvering.
- Cut: Using the hydraulic hose cutter, make a clean, straight cut at the measured length. A clean cut is essential for a good seal.
- Deburr: After cutting, use a deburring tool to remove any sharp edges from the cut end of the hose. This will prevent damage to the fittings or seals.
Step 3: Prepare the Hydraulic Fittings
- Cleanliness: Ensure that both the inside of the fitting and the outside of the hose are clean and free of any debris or contaminants. Any dirt or particles can compromise the seal.
- Lubrication: Apply a small amount of soap or lubricant to the outside of the hose where it will be inserted into the fitting. This will help the hose slide in smoothly and reduce friction.
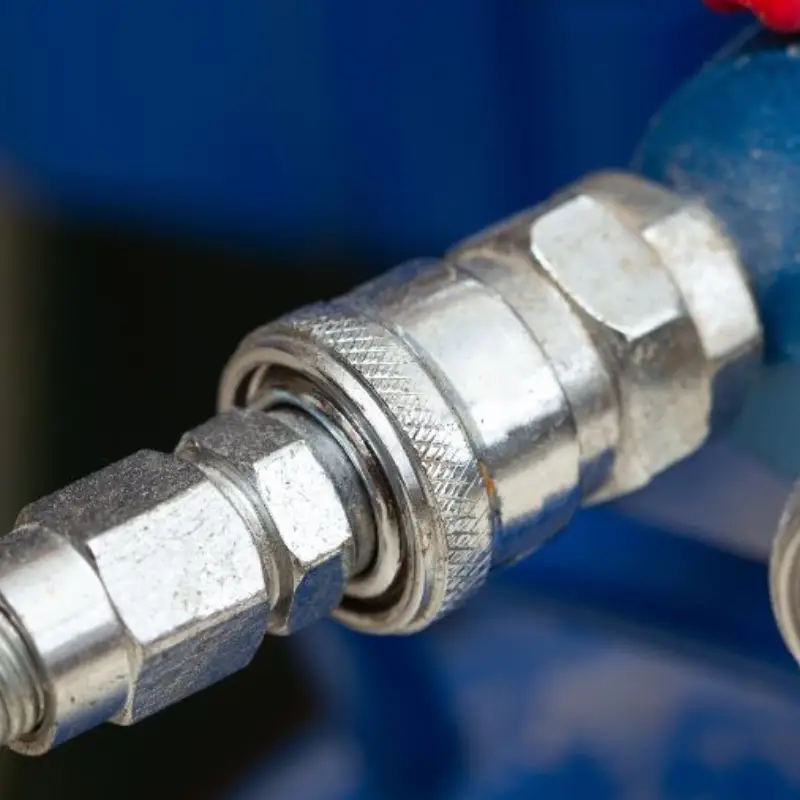
Step 4: Assemble the Fitting
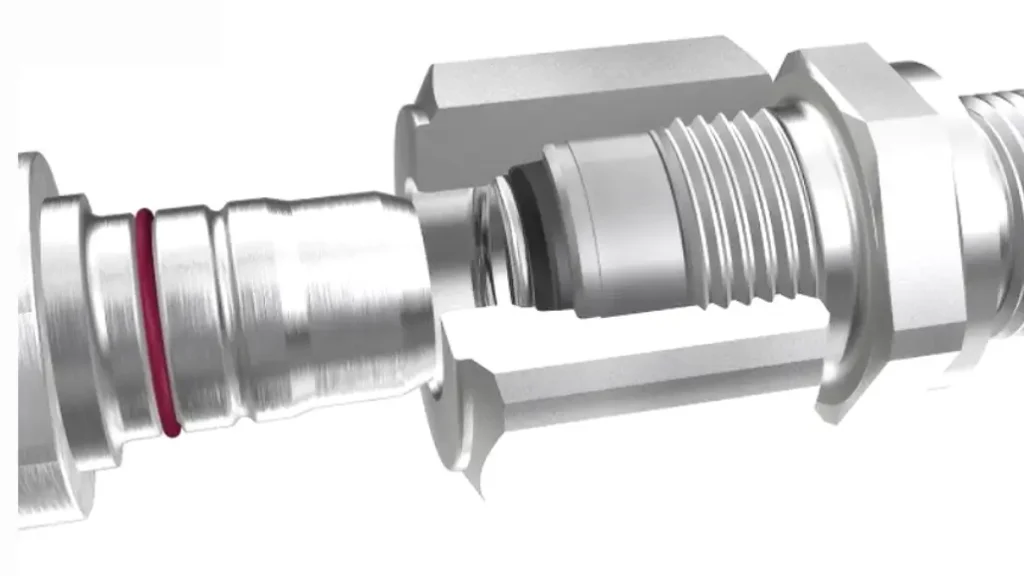
- Insert the Hose: Carefully insert the cut end of the hose into the fitting. Ensure that it is fully inserted up to the stop.
- Crimp: Using the crimping tool, crimp the fitting onto the hose. Follow the manufacturer‘s instructions for the specific crimping tool and fitting you are using. Ensure the crimp is tight and secure.
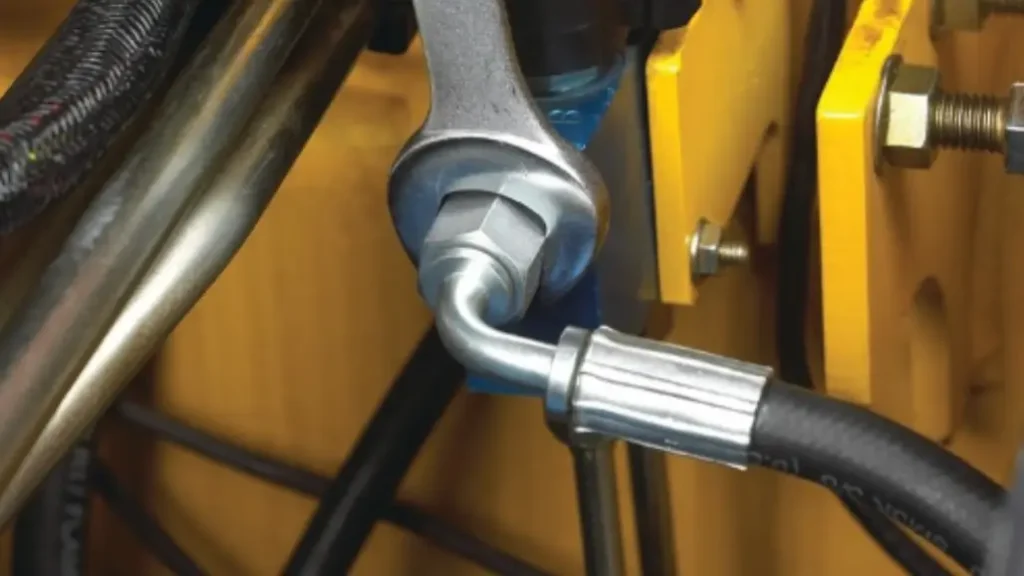
- Tighten: If the fitting has any threaded connections, use a wrench to tighten them securely. Be careful not to overtighten, as this could damage the fitting or the hose.
Step 5: Inspect and Test
- Visual Inspection: Once the connection is complete, carefully inspect the connection for any leaks or damage. Look for any signs of the hose being crimped incorrectly or the fitting being damaged.
- Pressure Test: If possible, perform a pressure test on the connection to ensure it is leak-free. This is especially important for high-pressure applications.
Additional Tips:
- Compatibility: Always ensure that the fittings and hose are compatible with the fluid being used and the operating pressure of the system.
- Torque Specifications: Refer to the manufacturer‘s torque specifications for tightening the fittings. Overtightening can damage the fittings or the hose, while under-tightening can lead to leaks.
- Safety: Always prioritize safety. Wear appropriate safety gear, follow safety procedures, and work in a well-ventilated area.
By following these steps and taking the necessary precautions, you can safely and effectively connect hydraulic fittings.
Pre-Installation Inspection of Hydraulic Fittings
Pre-installation inspection is a critical step in ensuring the successful and safe operation of any hydraulic system. This meticulous examination goes beyond simply gathering materials. It involves a thorough assessment of all components to identify potential issues before they lead to costly downtime or safety hazards.
Here’s a deeper look at the key aspects of a pre-installation inspection for hydraulic fittings:
1. Hydraulic Fitting Inspection:
Visual Examination:
- Corrosion: Check for any signs of corrosion on the fitting’s surface, especially in areas prone to moisture or harsh environments. Corrosion can weaken the fitting and compromise its integrity.
- Damage: Inspect for any dents, cracks, or other forms of physical damage that could affect the fitting’s ability to hold pressure or create leaks.
- Thread Integrity: Carefully examine the threads for any signs of damage, such as stripped threads or burrs. Damaged threads can prevent proper connection and lead to leaks.
- Material Compatibility: Verify that the fitting material is compatible with the hydraulic fluid and the operating environment. Incompatibility can lead to corrosion, degradation, and premature failure.
- Marking and Identification: Ensure that the fittings are properly marked with their size, pressure rating, and material specifications. This information is crucial for proper selection and installation.
2. Hydraulic Hose Inspection:
Visual Examination:
- Cover Integrity: Inspect the hose cover for any signs of abrasion, cuts, or cracks. A damaged cover can expose the inner layers of the hose to environmental factors, leading to premature failure.
- Reinforcement: Examine the reinforcement layer for any signs of separation or damage. The reinforcement layer provides structural support and is critical for maintaining the hose’s integrity under pressure.
- Crib Damage: Check for any signs of crimping damage, such as cracks or deformation, at the points where the fittings are attached. Improper crimping can weaken the hose and lead to leaks or ruptures.
Length and Routing: Ensure that the hose is the correct length and that the routing allows for sufficient flexibility and minimizes stress on the hose. Avoid sharp bends or kinks, as these can weaken the hose and reduce its service life.
Compatibility: Verify that the hose is compatible with the hydraulic fluid, operating pressure, and temperature range of the system.
3. Component Compatibility:
- Fitting-to-Hose Compatibility: Ensure that the fittings are compatible with the specific type of hose being used. This includes compatibility with the hose’s inner diameter, wall thickness, and the crimping method.
- System Compatibility: Verify that all components, including fittings, hoses, and other system components, are compatible with each other and with the operating parameters of the hydraulic system.
4. Documentation Support:
- Manufacturer‘s Specifications: Review the manufacturer‘s specifications for the fittings, hoses, and other components to ensure that they meet the requirements of the application.
- Installation Instructions: Carefully review the manufacturer‘s installation instructions for the specific fittings and hoses being used. This will ensure that the installation is performed correctly and safely.
5. Work Area Assessment:
- Safety: Assess the work area for potential safety hazards, such as slippery surfaces, electrical hazards, or confined spaces. Take appropriate safety precautions to minimize the risk of injury.
- Cleanliness: Ensure that the work area is clean and free of debris. Foreign matter can contaminate the hydraulic system and lead to malfunctions.
By conducting a thorough pre-installation inspection, you can:
- Prevent costly downtime: Identify and address potential issues before they lead to system failures.
- Improve system reliability: Ensure that all components are properly selected and installed, resulting in a more reliable and efficient hydraulic system.
- Enhance safety: Minimize the risk of accidents and injuries by identifying and mitigating potential hazards.
- Extend component life: Proper selection and installation can significantly extend the service life of hydraulic fittings and hoses.
Pre-installation inspection is not just a hydraulic fitting installation checklist; it’s a critical thinking process that requires careful attention to detail and a thorough understanding of hydraulic systems. By investing time in this crucial step, you can significantly improve the performance and longevity of your hydraulic equipment.
How to Put Fittings on Hydraulic Hose
Here’s a step-by-step guide on how to properly install fittings onto hydraulic hoses:
Step 1: Prepare the Hose
- Measure and Cut: Accurately measure the required hose length. Use a sharp, dedicated hydraulic hose cutter to make a clean, perpendicular cut. Avoid using tools that could crush or deform the hose.
- Deburr: Remove any sharp edges or burrs from the cut end of the hose. This prevents damage to the fitting and ensures a smooth, even insertion. Use a deburring tool specifically designed for hydraulic hoses.
Step 2: Prepare the Fitting
- Cleanliness: Thoroughly clean both the inside of the fitting and the outside of the hose where it will be inserted. Remove any dirt, dust, oil, or other contaminants. Even small particles can interfere with the seal and cause leaks.
- Consider using compressed air to blow away debris.
- For stubborn contaminants, you may need to use a suitable cleaning solvent.
- Lubrication: Apply a thin, even coat of hydraulic hose assembly lubricant to the outside of the hose where it will enter the fitting. This reduces friction and helps ensure smooth insertion.
- Avoid using excessive lubricant, as this can interfere with the crimping process.
Step 3: Insert the Hose into the Fitting
- Alignment: Carefully insert the prepared hose end into the fitting. Ensure the hose is inserted straight and fully seated.
- If the fitting has any alignment features (e.g., grooves, notches), ensure they are properly aligned.
- Visual Inspection: After insertion, visually inspect the assembly to ensure the hose is fully seated and there are no visible gaps or misalignments.
Step 4: Crimp the Fitting
- Select the Correct Crimping Die: Choose the appropriate crimping die set for the specific hose diameter and fitting type. Refer to the manufacturer‘s instructions and any applicable industry standards.
- Position in Crimping Machine: Place the hose assembly in the crimping machine according to the manufacturer‘s instructions. Ensure the fitting is properly positioned in the die.
- Crimp: Activate the crimping machine. The machine will apply a controlled force to the fitting, deforming the fitting’s ferrule or sleeve to create a secure, leak-proof connection.
- Observe the crimping process to ensure the fitting is crimped evenly and to the specified dimensions.
Step 5: Inspect the Crimped Assembly
- Visual Inspection: Carefully inspect the crimped assembly for any signs of damage, such as cracks, splits, or deformation.
- Leak Test: If possible, perform a leak test on the assembly to ensure it is leak-free. Apply a small amount of hydraulic fluid to the crimped area and observe for any signs of leakage.
- Torque Check: If the fitting has threaded connections, torque them to the manufacturer‘s specified values using a torque wrench.
Step 6: Final Inspection and Installation
- Thorough Inspection: Conduct a final inspection of the entire assembly, ensuring all components are properly installed and there are no signs of damage or potential leaks.
- Install in System: Carefully install the completed hose assembly into the hydraulic system. Ensure proper routing and support to prevent stress on the hose and fittings.
Important Notes:
- Safety First: Always wear appropriate safety gear, such as safety glasses and gloves, during the entire process.
- Compatibility: Ensure that the hose, fittings, and crimping method are compatible with the hydraulic fluid and operating conditions of the system.
- Refer to Manufacturer‘s Instructions: Always consult the manufacturer‘s instructions and any applicable industry standards for specific procedures, torque values, and safety guidelines.
By following these steps and adhering to safety precautions, you can successfully install hydraulic fittings onto hoses, ensuring a reliable and leak-free connection.
Conclusion
Properly connecting hydraulic fittings is crucial for ensuring the safety, reliability, and performance of your hydraulic systems. By following the guidelines outlined in this guide, you can minimize the risk of leaks, failures, and costly downtime.
Ready to upgrade your hydraulic system with high-quality, reliable fittings? We offer a wide range of hydraulic fittings designed to meet the most demanding applications. Contact us today to discuss your specific needs and receive a customized quote.


